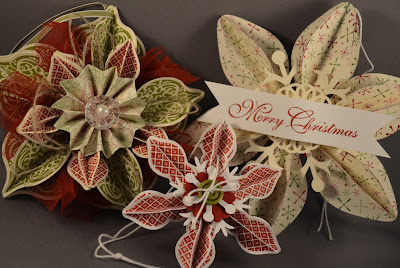
Did you fall in love with the ornament on the cover of the Holiday Catalog: I did!
Last Saturday I had a class on how to make these beauties. We made three different sizes as shown in the catalog. Here is a picture of the 3 ornaments they made in class, we had a lot of fun. I went on to make two additional designs and changed things up a little. I'll show you those in another post later this week.
Here are the supplies to make the double layer ornament as seen on the cover of the Holiday Catalog.
Ornament Keepsakes Stamp Set
Holiday Ornaments Framelits Die
5 Pieces of 3" x 11" of Very Vanilla Card Stock (20 ornaments)2 Pieces of 2 1/2" x 11" Very Vanilla Card Stock (20 ornaments)
5 Pieces of Cherry Cobbler Scallop Tulle cut every 3 scallops
5 Pieces of Linen Thread 12" long
1 - 1 1/4"Circle Punched Old Olive Card Stock
1 - 1 3/4" Scallop Circle Punched Cherry Cobbler Card Stock
1 - 12" Piece of Old Olive 1/8" Taffeta Ribbon
Rosette: 1" x 12" score 1/4" DSP Be of Good Cheer
1 Vintage Button with a Large Pearl attached in the center
Silicone Craft Sheet
Glue Gun
Liquid glue
- Score 15 of each size ornament down the center a total of 30 ornaments 15 large and 15 small. Fold the ornaments in half rights sides together.
- Glue three ornaments together to form the 3-D ornament and then glue the un-scored ornament to the back of your 3-D ornament, (see picture below). You will have 5 large olive ornaments and 5 small cobbler ornaments when you are done.
3. On your silicone craft sheet start with the Old Olive 1 1/4" circle and hot glue five of the 3 dimensional ornament to the circle at the neck without overlapping the ornaments. (picture below)
4. Hot glue the Cherry Cobbler Tulle ribbon between the ornaments.
5. Hot glue the small cobbler ornaments between the Olive ornaments they should be standing up a little. (picture below)
6. Take one piece of linen thread and tie the ends together to from a circle then twist (figure 8) and make two circles, hot glue between the small cobbler ornaments.
7. Create your rosette and hot glue to center.
8. Hot glue vintage button with large pearl in the center to the center of your rosette.
9. Decide where the top of your ornament is and punch a whole, string 1/8” Old Olive Taffeta Ribbon.
You just completed your first ornament, the other two go together in the same order without the second layer of ornaments. I'll post supplies and pictures later this week. I'm off to design a halloween ornament now to share with a few of my craft friends.


No comments:
Post a Comment