Tuesday, September 25, 2012

Hydroponic Garden


This is my second year with the hydroponic garden and we have learned a lot. This is the 4th planting and the 3rd time we moved the whole system. We have many trees in the yard that make it difficult to find a spot that receives lots of sunshine. It seems to be doing well in this location and I really enjoy having it right next to the deck. Its nice to sit on the deck and watch the veggies grow.

This planting we have:
tomatoes, 4 different varieties, 2 are heirloom
green peppers, pimiento peppers
bib lettuces
green beans, lima beans, peas
acorn squash
carrots
collards

As you can see from the photos everything is doing well, I'm hoping for a bumper crop.


Next month I’ll be trying my hand at a potato box. Dawn (a friend & co-worker) and I watched several youtube videos and we think we can make this work. The concept is to start with a wood box or bucket of some kind; I'm going to try a 5 gallon bucket to start. You add several inches of lose soil mixture to a 5 gallon bucket that you have drilled several whole in for drainage and air flow (bottom & sides). Plant the potato starters and when them grow to about 6 inches tall, then add an additional 3 inches of dirt and watch the potatoes grow another 6 inches and then add an additional 3 inches of dirt and continue doing this until you reach the top of the bucket. When its time to harvest you should have a bucket full of potatoes. Sounds like fun!


Saturday, September 22, 2012

Here Kitty Kitty

Here she is Frightening Feline, she doesn't look all that frightening to me. This is a single stamp that can be found in the Holiday Catalog on page 26. I also used the Paper Piercing Pack on page 30 which coordinates with the Window Frames Collection, Holiday Ornaments and Labels Collections Framelits. Paper piercing is a fast and easy way to add a little texture to a project. Check out the Annual Catalog for the mat and piercing tool.  


The new Howlstooth & Scaringbone DSP wasn't my first choice for Halloween paper but now that I have used it on a few project I really love the colors and patterns. This paper could be used all year round and that's a plus for me since I never seem to use all my holiday DSP up during the holiday.  This DSP will be great for masculine project as well as Thanksgiving. 

Here is the completed card and its hard to tell but the cat was stamped on Natural Ivory Card Stock. I always forget about the natural ivory and it just gives the card a little more rustic look.  


Wednesday, September 19, 2012

Fall Pumpkin's


It’s almost Fall, the weather man said, Saturday is the day and I’m waiting to see if Mother Nature drops the temperature a degree or two here in the Sunshine State. 

Anyway to convince myself that Fall will be here in a few days I created this cute little pumpkin from the 3 x 3 Kraft Box 124106 (page 161) I created the leaves using the Bigz Die Autumn Accents and stamp set Wonderfall 128087 (page 33 Holiday). The base of the leave was punched from Always Artichoke using the 2 3/8” Scallop Circle Punch. The stem and the curly vines were little strips of paper wrapped around the piercing tool. I will make several of these for Thanksgiving Dinner and use them for name tag place settings and put something special in there for the kids and adults.

Pumpkin Box


Monday, September 17, 2012

Lazy Sunday!

I love Sunday's and today was a lazy one. It rained most of the day and I stamped and completed all my Christmas cards for this year! Yahooooooo! I haven't done that in a while. 

Snow Flurry 
I love the new Bigz Die Snow Flurry that features three different size snow flakes. I used the two small snow flakes on this card with the silver glimmer paper. It was easy to cut out the Christmas tree with the Holiday Collection Framelits.  To change it up a little I made the card both horizontal and vertical.

Horizontal and Vertical Matching Designs


Friday, September 14, 2012

Good Morning! 


Fall Apple Martini 


I didn't post last night because I just was feeling lazy after a wonderful meal at Bonefish Grill and two Fall Apple Martinis. That was my downfall the second martini but they taste so good and go down so easy! 


 I wanted to share with you today a project we made at club this week using the Ghoulish Googlies Bundle for the Holiday Catalog on page 27. 


Stampin Up showed you how to simple project with this bundle by add the tag and baker's twine for a fast, cute project but I had to step it up a notch. I used the Rosette Bigz Die and made a rosette with two strips of 1 1/2" x 12" Howlstooth & Scaringbone DSP. I also used one of my favorite sets Spooky Bingo Bits, the skull worked well with the goggly eyes. I made the open flap out of Basic Black cs 3" x 2 1/2" this gave me a place to hot glue the rosette tag. I also ran the glassine bag through the big shot using the new Chevron Folder at club we also used the  Spider Wed and Perfect Polk a Dot to change the bags up a little.


Cute Cute Candy
Then for the "CANDY" with such a cute bag the candy had to be equally cute. I wrapped mini Kit Kats, nuggets and kisses. They are adorable and almost to good to eat.....I said almost! I had extras out so we could keep our energy up...giggle giggle!


Finished Goggly Bags


Thursday, September 13, 2012

Cute Little Gift Tags


I love to make gift tags, they're simple and easy and I always get carried away with all the possibilities. Here are three that we made at the Ornament Class last Saturday. They were quick and easy; my favorite is the Ornament tag. I used a 3" x 6" W.White card stock fold it in half and stamp the ornament just a little bit over the fold. Then using the Ornament Framelits I positioned it just past the fold so it would not be cut as it ran through the Big Shot. Voila, a very cute ornament tag I punched a little whole at the top and tied white Bakers Twine to finish it off then stamped To: and From: on the inside.


I used Snow Festival DSP paper on the other two cards. One sheet actually has 16 - 3" x 3" designs perfect for gift cards. The 3rd card I stamped the small round ornament from the Ornament Keepsakes Set and used the matching framelits to cut it out stamped the ornament again in Gumball Green and punched out the center with 3/4" circle punch. 

Been a long day today, painted the new master bathroom and closet. Now the room is ready for the contractor to lay tile. I hope its completed in the next month it's been going on for too long! Have a great evening. 
  

Wednesday, September 12, 2012

Wishful Thinking

I love Fall! Since I live in Florida is means the air will be dryer and I can open the windows and let the fresh air in, listen to the birds sing and not stick to everything. None of that has happened yet, its still hot and sticky and the AC is still running.....wishful thinking on my part!

Our new Orchard Harvest collection is Fall inspired. I used several new products to make this card: Orchard Harvest Designer Fabric,  Jumbo Sticky Rounds, Wonderfall Stamp set, Bigz Die Autumn Accents, Linen Thread and Naturals Designer Buttons.


To create the flower I cut a strip of fabric 1 inch by 18 inches, fold it in half long ways and tie a knot at one end. Place the knot in the center of a sticky round and start twisting and placing the fabric around the knot in a circle until all your fabric is gone. Peel the sticky round off the white paper and adhere to your project.


The sentiment stamp is from the "Word Play" stamp set found on page 135 of the Annual Catalog.


Tuesday, September 11, 2012

Frankie! Oh how I love you Frankie!

Isn't he the sweetest little guy, Gumball Green and goggly eyes! How awesome that Stampin Up has bundled several sets in the Holiday catalog and Googly Ghouls is one of them. Check out page 27 you get the Googly Ghouls stamps set and the Ghoulish Googlies Designer Kit which is filled with 20 double sided tags, 10 glassine bags with a die cut edge, goggly eyes and Pumpkin pie/Whisper White Bakers Twine.


The new Paper-Piercing Pack Festive coordinates with the Labels Collection Framelits that I used to frame Frankie. Paper-piercing gives a little extra texture to your projects and its so simple to do.


 I almost missed this 1/2 inch Striped Satin Ribbon in the Holiday Catalog. I was so busy looking at the rosette on tha page I didn't notice it at all until my niece pointed it out to me. It is printed on one side so its like getting 2 ribbons in 1.

Do you have the Bat Punch? Last time I looked it was still on the clearance rack.

I used the Fancy Favor Box and Designer Rosette Bigz Dies to create this project. The DSP is Howlstooth & Scaringbone Paper found on page 24 of the Holiday Catalog.


Monday, September 10, 2012

Dazzling Ornament

I know we still have several months before Christmas but this year is flying by to fast and I need 50 Christmas Cards to mail out by December 1. This card was easy to make with simple lines. I love our Glimmer Paper and now we have 3 great colors, Silver, Gold and now Champagne. All the bling without all the mess - glitter doesn't brush off! It can also be used in the big shot with most of your dies.


I also used the new Holiday Frame Textured Impressions Embossing Folder show on page 7 of the Holiday Catalog. To create the larger ornament from the glimmer paper I simple traced the outer edge of the ornament framelits that I used on the back side of the glimmer paper and cut it out with my scissors.


The ribbon is the Gumball Green Stitched Satin Ribbon: its so soft. I now have a good start on my Christmas cards, only about 30 more to go....giggle giggle!

Sunday, September 9, 2012

Christmas Paper Ornaments!


Did you fall in love with the ornament on the cover of the Holiday Catalog: I did!

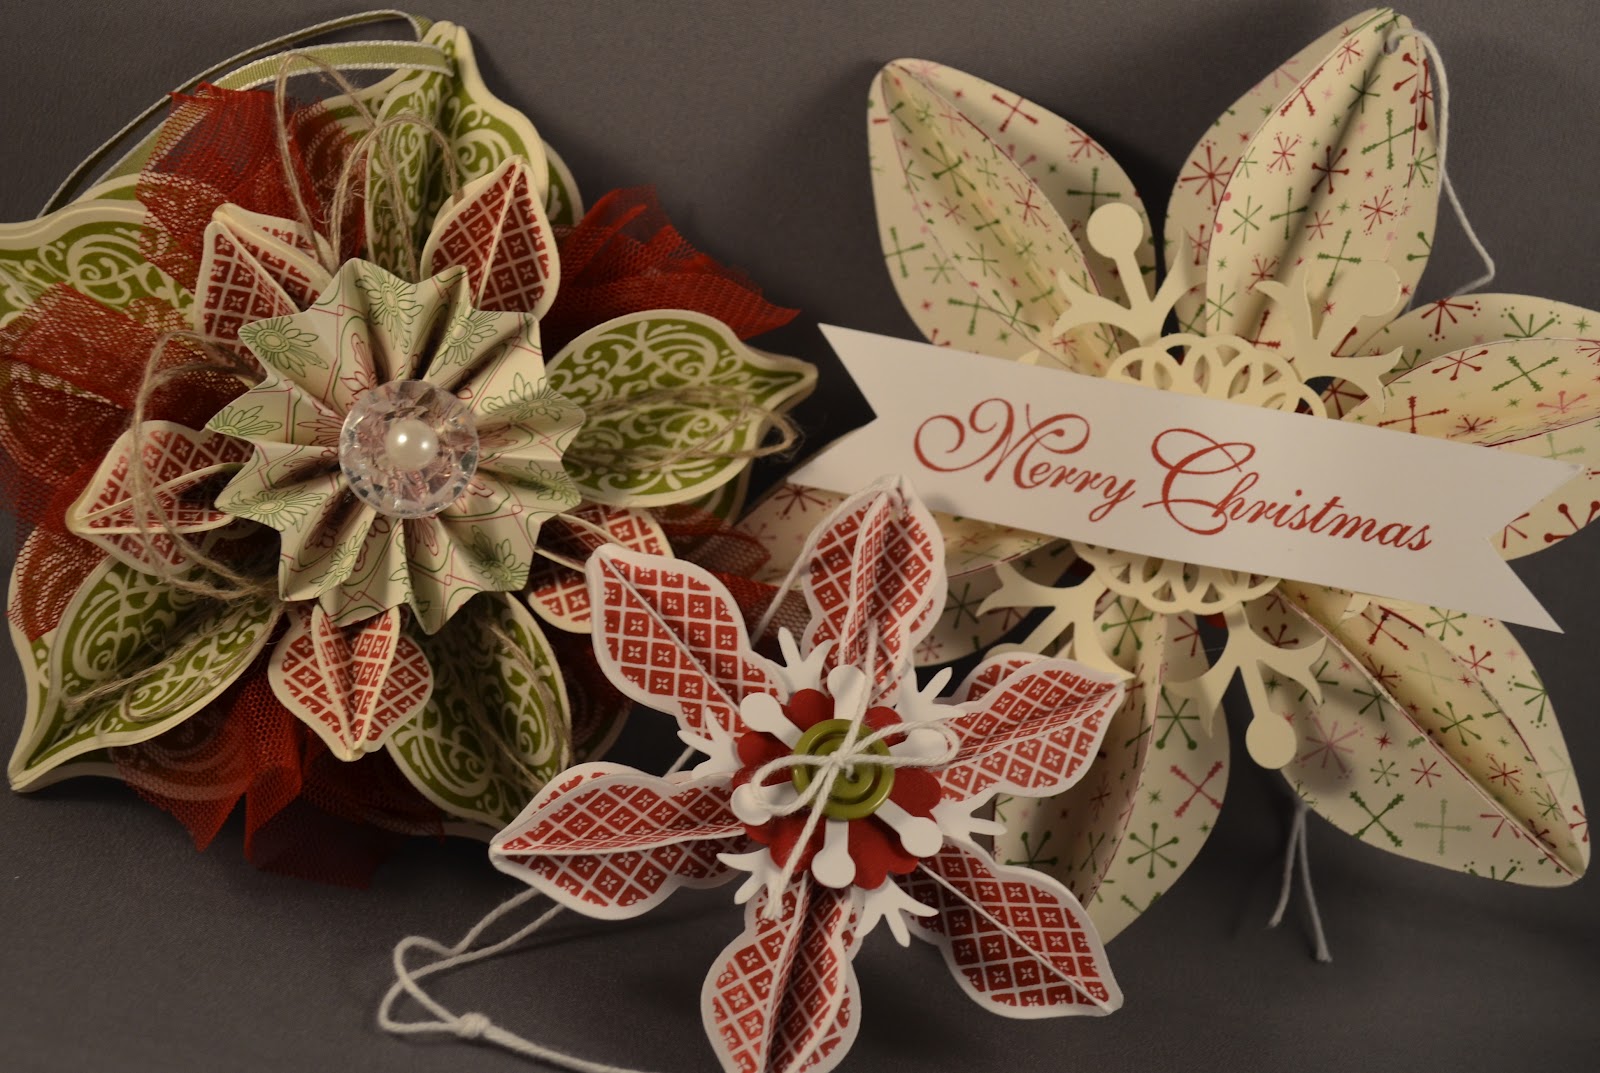
Last Saturday I had a class on how to make these beauties. We made three different sizes as shown in the catalog. Here is a picture of the 3 ornaments they made in class, we had a lot of fun. I went on to make two additional designs and changed things up a little. I'll show you those in another post later this week.


Here are the supplies to make the double layer ornament as seen on the cover of the Holiday Catalog.

Ornament Keepsakes Stamp Set
Holiday Ornaments Framelits Die
5 Pieces of 3" x 11" of Very Vanilla Card Stock (20 ornaments)
2 Pieces of 2 1/2" x 11" Very Vanilla Card Stock (20 ornaments)
5 Pieces of Cherry Cobbler Scallop Tulle cut every 3 scallops
5 Pieces of Linen Thread 12" long
1 - 1 1/4"Circle Punched Old Olive Card Stock
1 - 1 3/4" Scallop Circle Punched Cherry Cobbler Card Stock
1 - 12" Piece of Old Olive 1/8" Taffeta Ribbon
Rosette: 1" x 12" score 1/4" DSP Be of Good Cheer
1 Vintage Button with a Large Pearl attached in the center
Silicone Craft Sheet
Glue Gun
Liquid glue

Stamp 5 of the large round shaped ornament on the 3"x 11" Vanilla using Old Olive Ink, you should stamp 5 ornaments on each strip of paper giving you 20 total ornaments. Then use the coordinating framelits to cut all 20. Repeat that process the the small ornament stamped with Cherry Cobbler, you should get 10 stamped ornaments on each 2" vanilla strip cut out with framelits. 


  1. Score 15 of each size ornament down the center a total of 30 ornaments 15 large and 15 small. Fold the ornaments in half rights sides together.
  2. Glue three ornaments together to form the 3-D ornament and then glue the un-scored ornament to the back of your 3-D ornament, (see picture below). You will have 5 large olive ornaments and 5 small cobbler ornaments when you are done.


3. On your silicone craft sheet start with the Old Olive  1 1/4" circle and hot glue five of the 3 dimensional ornament to the circle at the neck without overlapping the ornaments. (picture below)


4. Hot glue the Cherry Cobbler Tulle ribbon between the ornaments.


5. Hot glue the small cobbler ornaments between the Olive ornaments they should be standing up a little. (picture below)


6. Take one piece of linen thread and tie the ends together to from a circle then twist (figure 8) and make two circles, hot glue between the small cobbler ornaments.

7. Create your rosette and hot glue to center.

8. Hot glue vintage button with large pearl in the center to the center of your rosette.

9. Decide where the top of your ornament is and punch a whole, string  1/8” Old Olive Taffeta Ribbon.

You just completed your first ornament, the other two go together in the same order without the second layer of ornaments. I'll post supplies and pictures later this week. I'm off to design a halloween ornament now to share with a few of my craft friends. 


Monday, September 3, 2012

Merry Christmas


I decided to get ready for the holidays early this year! I don't want to be rushing around making my Christmas Cards when they should be in the mail. This year I had a Stamp-a-Stack in August featuring the "Owl Occasions" set, (that I love so much) here are the cards that we made.

I also used the New Delicate Designs Folders.


The second cards I used the Northern Flurry Embossing Folder to give the background a little extra texture. I only have 40 more card to complete...giggle giggle!
Happy Stampin Everyone!

Saturday, September 1, 2012


September Promotion from Stampin Up!


They did it again, another great offer to help you get ready for the holidays and purchase new product.

During September you will receive a FREE package of 3/8" Stitched Satin Ribbon with every $40 purchase. Choose from any of the 2012-2014 In Colors - or spend $200 and get all five!


Gumball Green, Midnight Muse, Summer Starfruit, Raspberry Ripple and Primrose Petals